In our previous installment we have learnt how to create a new Themosis framework project, how to setup a local development environment using Laravel Homestead, install a new default theme and configure our blog application environment.
In this second article, you’ll learn how the routing API is working within the Themosis framework and will set the default home page route.
You can follow the video below to complete this second part of our tutorial and/or also read the transcripted content for details.
Video
Tutorial
You must have completed the first part of this tutorial in order to follow the next steps.
At this point we have a running Themosis framework application with a default theme that displays the “welcome” view. Let’s learn how to use the Themosis framework Routing API to listen on requests and return a custom content… but before that, just a quick note on how this is all working together.
WordPress template hierarchy
When working with what I call a “classic” WordPress installation, requests are handled automatically for you by WordPress core. Basically it parses the request and it looks after specific files into your theme in order to output some content.
The mechanics behind this request “parsing” can be found in the template-loader.php file inside WordPress. Here is a code snippet:
if ( wp_using_themes() ) {
    $tag_templates = array(
	'is_embed'             => 'get_embed_template',
	'is_404'               => 'get_404_template',
	'is_search'            => 'get_search_template',
	'is_front_page'        => 'get_front_page_template',
	'is_home'              => 'get_home_template',
	'is_privacy_policy'    => 'get_privacy_policy_template',
	'is_post_type_archive' => 'get_post_type_archive_template',
	'is_tax'               => 'get_taxonomy_template',
	'is_attachment'        => 'get_attachment_template',
	'is_single'            => 'get_single_template',
	'is_page'              => 'get_page_template',
	'is_singular'          => 'get_singular_template',
	'is_category'          => 'get_category_template',
	'is_tag'               => 'get_tag_template',
	'is_author'            => 'get_author_template',
	'is_date'              => 'get_date_template',
	'is_archive'           => 'get_archive_template',
);
At recording, the code was from WordPress 5.2 where the code shown here is from WordPress 5.3.
Basically it parses the request into this file, checking the request by calling one function like is_single. If this functions returns true, then look inside the theme if a specific file single.php for example is available using the get_single_template() function.
If such a file exists, WordPress output its content. Otherwise it fallbacks to the theme index.php file. Here is an illustrated way to explain this:
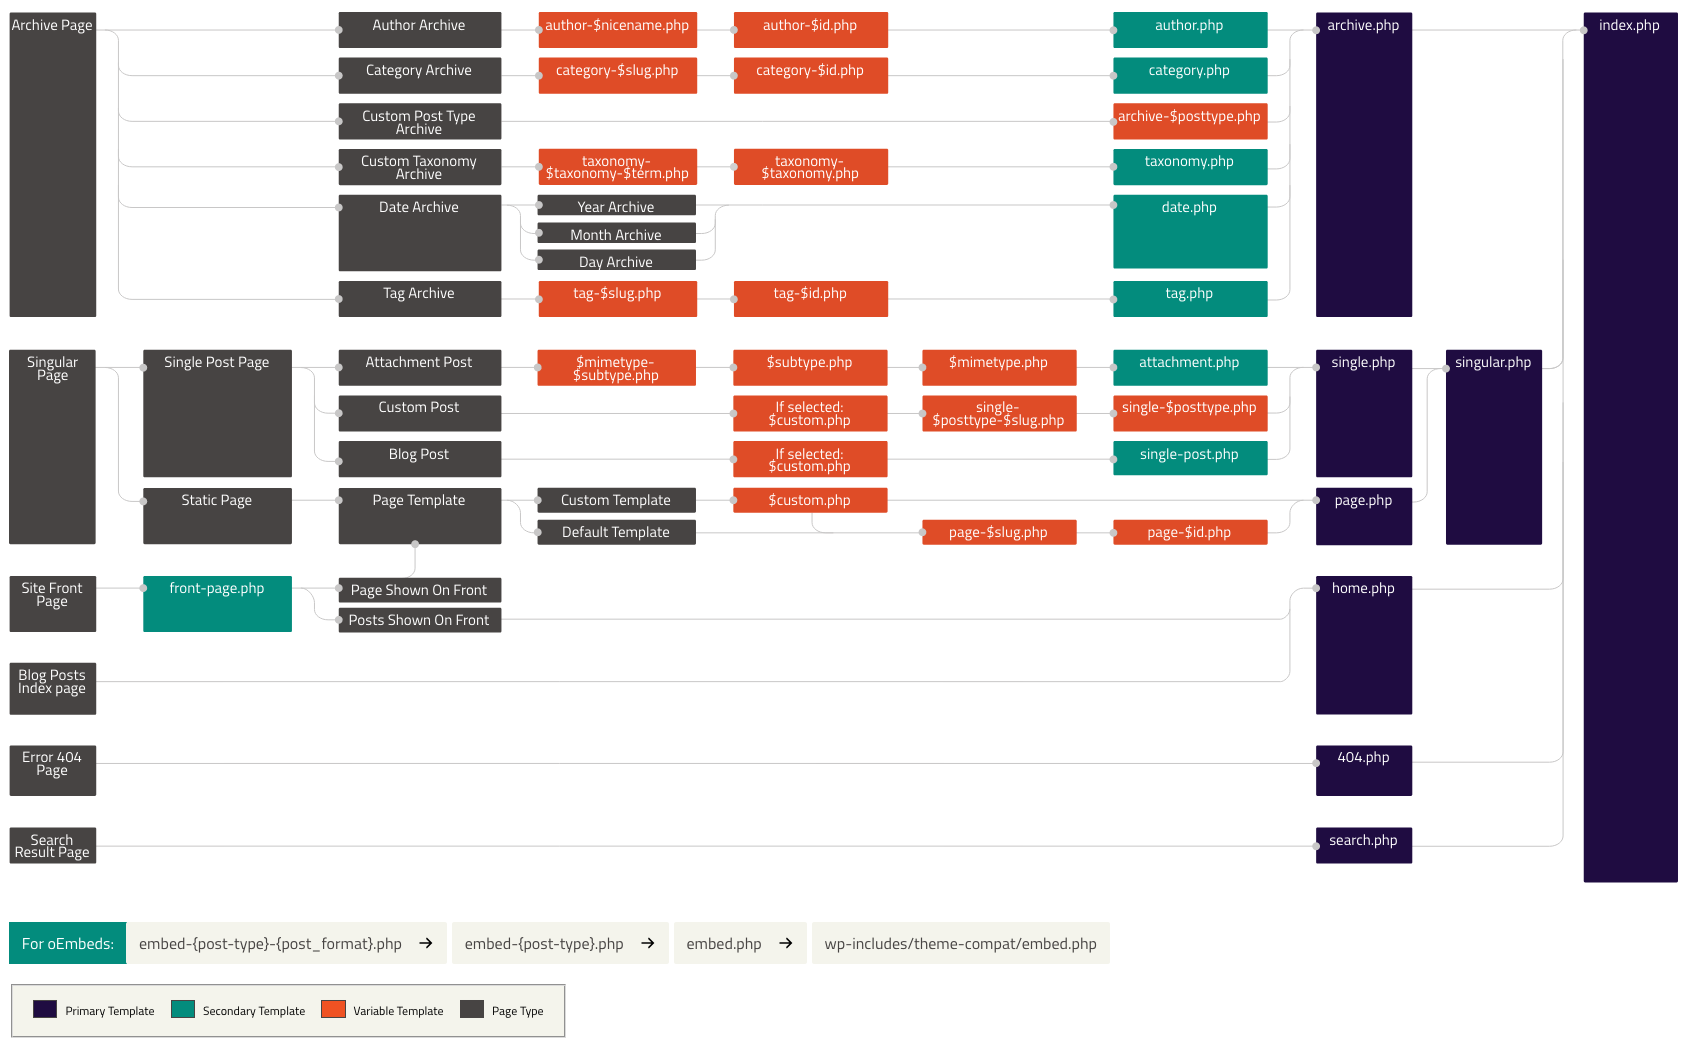
So, when working with a theme within the Themosis framework, we simply make sure that all requests point to the theme index.php file. And from there, the framework takes care of the request using the Routing API. Here is what you should find inside a Themosis theme index.php file:
<?php

use Illuminate\Contracts\Http\Kernel;
use Themosis\Core\Application;

/**
 * Default WordPress template.
 *
 * By default, routes should be defined at application
 * root into the routes/web.php file.
 *
 * Routes can be overwritten using theme routes.php file.
 */
$app = Application::getInstance();
$app->manage(Kernel::class, $app['request']);
So now that all the requests can be handled by the framework, where should I define the routes for my application?
Routing 101
Since release 2.0, all routes should be defined into the routes/web.php file located at the root of your application. If you’re coming from an older version of the framework where routes were defined inside a theme, simply stop doing so 🧐.
If you open the routes/web.php file, you should find this code snippet:
<?php

/**
 * Application routes.
 */
Route::get('/', function () {
    return view('welcome');
});
This is the default route defined upon installation of the framework. These three lines of code are responsible to return the HTML we see when visiting the home page of our application.
A route is a term used to define an “endpoint” or “point of access” when visiting a URL within our application. So when declaring Route:: inside the file, we “register” an endpoint. Then the method used here is get() which tells the route to listen only on GET requests. Then the first parameter passed to the function is an URI parameter, here is / which represents the home page. And finally we pass an anonymous function that returns the welcome view. A view file is basically just HTML code.
In this default example, the welcome view is stored inside the resources/views/welcome.blade.php file. If you look after it, you should only see HTML code.
Request methods
By default, when you work with WordPress, it doesn’t make a difference between a GET or a POST request. If you were running a GET and then a POST request on the home of a classic WordPress installation, WordPress will, by default, simply search after a front.php or home.php template file and will include it in order to display some content.
When working with a routing system, you have a total control of the “allowed” requests made to your website or application. Meaning that you can define routes that listens to specifc request verbs like GET, POST, UPDATE, DELETE, … or to all types at once. The meaning here is that for example you could define a GET route on the home page that displays some content with a form and then define a POST route still for the home page but will only treat the submitted data and then redirect back to the home page using a GET request. The advantage here is that you can split your code and have one part managing the display of the content while the other part is managing business logic like registering data into a database.
In order to define routes based on a HTTP request verb, the routing API is providing multiple methods like these:
- Route::get() – Listens after GET request
- Route::post() – Listens after POST request (a form has been submitted)
- Route::put()
- Route::patch()
- Route::delete()
In the default route sample, the defined route is a “GET” route. Meaning that if a page was submitting form data to the home page, nothing will happen compared to a default WordPress installation.
Finally, the routing API is also providing a method that mimics the WordPress default behavior using the any() method. As the name implies, this route method will listen on all request types, be it a GET, POST, PATCH, …
Back to our simple blog application, let’s update the default route to use the any() method like so:
Route::any('/', function () {
    return view('welcome');
});
If you reload the home page in the browser, you should get the exact same content as before. Now before continuing into development, I would like to give an explanation on the two types of routes available within the Themosis framework.
Routes types
The Themosis framework supports what I call “classic routes” and “WordPress routes“.
Classic routes
Classic routes are basically what you expect from a routing API like in any development framework. You specify a URI as a first parameter and then return some content.
For example, let’s define a classic route and pass it the contact URI parameter. Add the following code snippet below the default route:
Route::get('contact', function () {
    return 'Contact us';
});
If you open the browser and visit the http://my-blog.test/contact URL, you should now see the “Contact us” string displayed on your screen.
This is a “classic route” as we have passed an URI as the first parameter.
WordPress routes
WordPress routes are specific to the framework and leverage the WordPress template functions in order to discover the request the user is currently in.
For example, let’s define a WordPress route that listens on requests made to single posts. Instead of passing a URI parameter, we’re going to pass what we call a “condition”. Add the following code below the previous in your routes/web.php file:
Rouge::get('single', function () {
    return 'Single post';
});
If you open the browser and try to visit the http://my-blog.test/single URL, you should hit a 404 page. This is because the parameter single is no longer a URI but a “condition”. A condition is a keyword recognized by the Themosis framework that is used to match the request to a specific WordPress template function.
This single WordPress route can in fact listen to requests made to any single posts published by WordPress. Let’s try to visit the default “Hello World” post inserted into our WordPress installation! Visit your WordPress Dashboard -> All Posts -> Hello World and click on the “View” link to access the published post. You should now see the “Single post” string displayed.
Look at the URL in your browser. At the time of this writing, our URL is http://my-blog.test/2019/11/14/hello-world/. Normally, if we were using a “classic route” to listen on such request, we should have written the following code for example:
Route::get('{year}/{month}/{day}/{name}', function () {
    return 'Single post';
});
The main issue with the above classic route is that we no longer follow the WordPress permalink structure registered by the user. By default it works but what happens if the end-user is changing its permalink structure to only use the post name? Well the above route is broken and single posts can no longer be displayed. That’s why we have those “WordPress routes” that allows use to easily target content published by WordPress.
But how can we manage those “WordPress routes” at the end?
Managing WordPress routes
As explained, a WordPress route is basically using a WordPress template function behind the scene. A WordPress template function is for example called is_home(), is_front_page(), is_single(), is_page(), … and the WordPress route is attaching some keywords to do a match against those template functions.
In order to find out all the WordPress routes available to you when working with the Themosis framework, simply open the config/app.php file stored at the root of your application. It’s the main configuration file for your application. An application comes loaded with multiple configuration files and they are basically just arrays with key/value pairs. If you look down the config/app.php file around line 226, you should find a property/key named conditions that should look like this:
'conditions' => [
    'is_404' => '404',
    'is_archive' => 'archive',
    'is_attachment' => 'attachment',
    'is_author' => 'author',
    'is_category' => ['category', 'cat'],
    'is_date' => 'date',
    'is_day' => 'day',
    'is_front_page' => ['/', 'front'],
    'is_home' => ['home', 'blog'],
    'is_month' => 'month',
    'is_page' => 'page',
    'is_paged' => 'paged',
    'is_page_template' => 'template',
    'is_post_type_archive' => ['post-type-archive', 'postTypeArchive'],
    'is_search' => 'search',
    'is_single' => 'single',
    'is_singular' => 'singular',
    'is_sticky' => 'sticky',
    'is_subpage' => ['subpage', 'subpageof'],
    'is_tag' => 'tag',
    'is_tax' => 'tax',
    'is_time' => 'time',
    'is_year' => 'year'
]Each key represents the signature or function name of a WordPress template function and its value contains one or multiple keywords. These are the WordPress routes conditions. So for our last route with a condition of single, we can see that behind the scene, the Themosis framework is matching the request to the is_single template function.
Because this is a configuration file, you have total control of it and can attach any keywords to a condition. By default, the framework bundles all default templates provided by WordPress core but if you need to add custom ones, then you can. For example, if you were to work with WooCommerce, you could add the following conditions in order to target the shop page or a single product:
[
    ...,
    'is_shop' => 'shop',
    'is_product' => 'product'
]
And that’s it for this second part of our getting started tutorial. I hope you now have a better understanding on how the routes can work within a Themosis framework application. In the next article, we’ll clean the routes, setup the theme and configure Laravel Mix to compile some assets and start building our own “twentynineteen” theme.
Feel free to explore the additional resources below for more details.
Next: Getting started with the Themosis framework – Part 3
Resources
Here is a list of references to check if you’re looking for more detailed informations on a subject: