Continuing our way to build a simple blog application with the Themosis framework, make sure to have fully read and completed the previous steps. You can start the tutorial by learning how to create a new project from scratch and how to setup a local development environment and then learn how the routing API is working within the Themosis framework.
Once you have completed the previous steps, you can follow along this third installment where we will learn the basics of the view API, setup Laravel Mix in order to compile our theme assets and how to use the Asset class to register and load files in our application.
You can view the video and/or read the written tutorial right below.
Video
Tutorial
Start with the home route
The goal here is to learn some of the Themosis framework API and not focusing on how to write HTML, CSS or Javascript code. So in order to help us, we’re going to create a theme based on the official WordPress Twentynineteen theme.
In fact, we already provide a completed theme converted to work with the Themosis framework. You can find our Twentynineteen version on our GitHub repository. So feel free to compare your code with it at the end of this tutorial.
Continuing our work based on part 2, open the routes/web.php file in your code editor. Remove all existing routes you have defined and replace them with this WordPress route:
Route::any('home', function () {
    // upcoming logic here...
});
This route is a WordPress route and it is using the is_home() WordPress template function behind the scene. We’re using this route instead of / or front because, by default, WordPress is considering the home page as an archive with the latest posts.
If we were to create a WordPress page and defined it as the front page through the settings, then, we would have used the Route::any('front', ...) condition instead.
Basically here we have a route that listens on the default WordPress “home” request or blog request, but we’re not yet doing anything with that. So let’s return some HTML when someone hits the home page in the browser.
Update the route statement and inside the second parameter, here the anonymous function, return a new view like so:
Route::any('home', function () {
    return view('blog.archive');
});
We’re using the view() helper function. As a first parameter, it accepts a relative path to one of any registered “views” directory within the application. If you open the htdocs/content/themes/twentynineteen theme, you should a views directory. This views folder is registered by the theme as a source directory where we can store view files. So the given path parameter passed to the view() helper function is a relative path based on that folder.
Just like in a classic WordPress installation, the theme should only be responsible to handle the output or layout of your application.
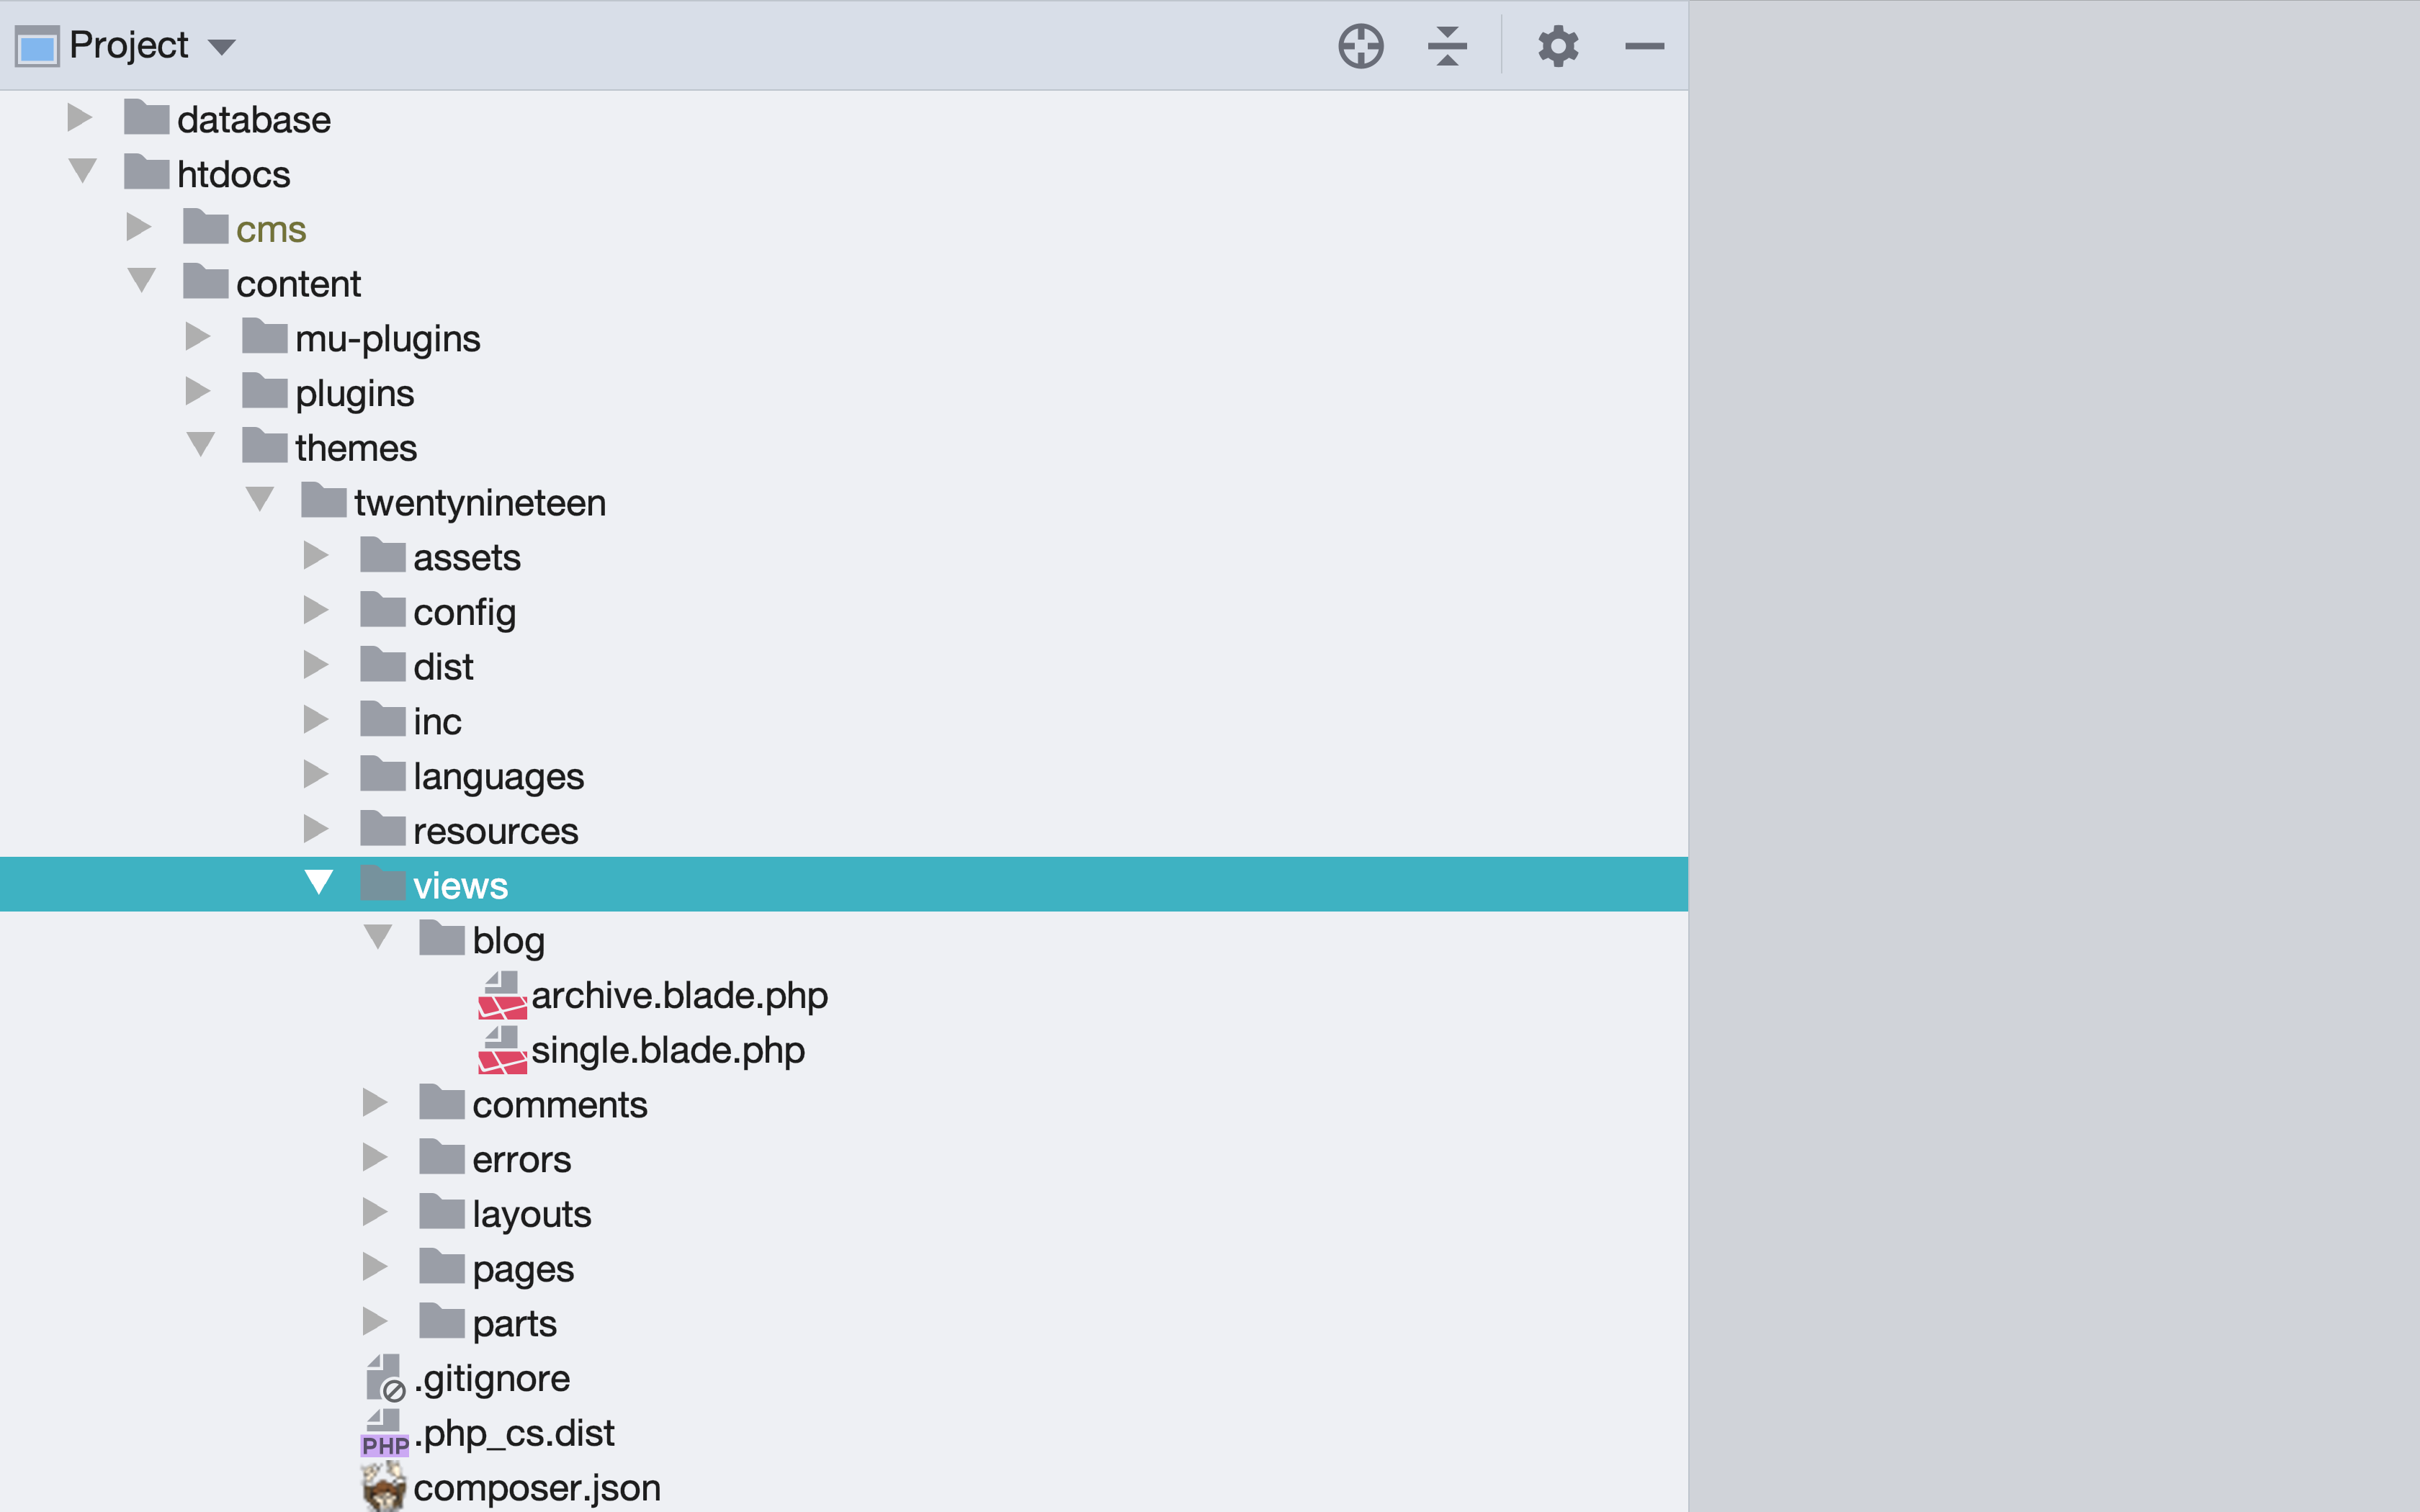
You can nest your view files in sub-directories. In order to point to a nested view file, we use a dot syntax to enter sub-directories. So in our code snippet, the blog.archive path means that we enter the blog folder and then fetch the archive file.
View files can have multiple file extensions. By default, it is recommended to work with the Blade engine by setting the file extension to .blade.php. But the Themosis framework also supports the Twig template engine or simply PHP. So you could definitely use a file name of either archive.twig or archive.php and the view helper function will find it.
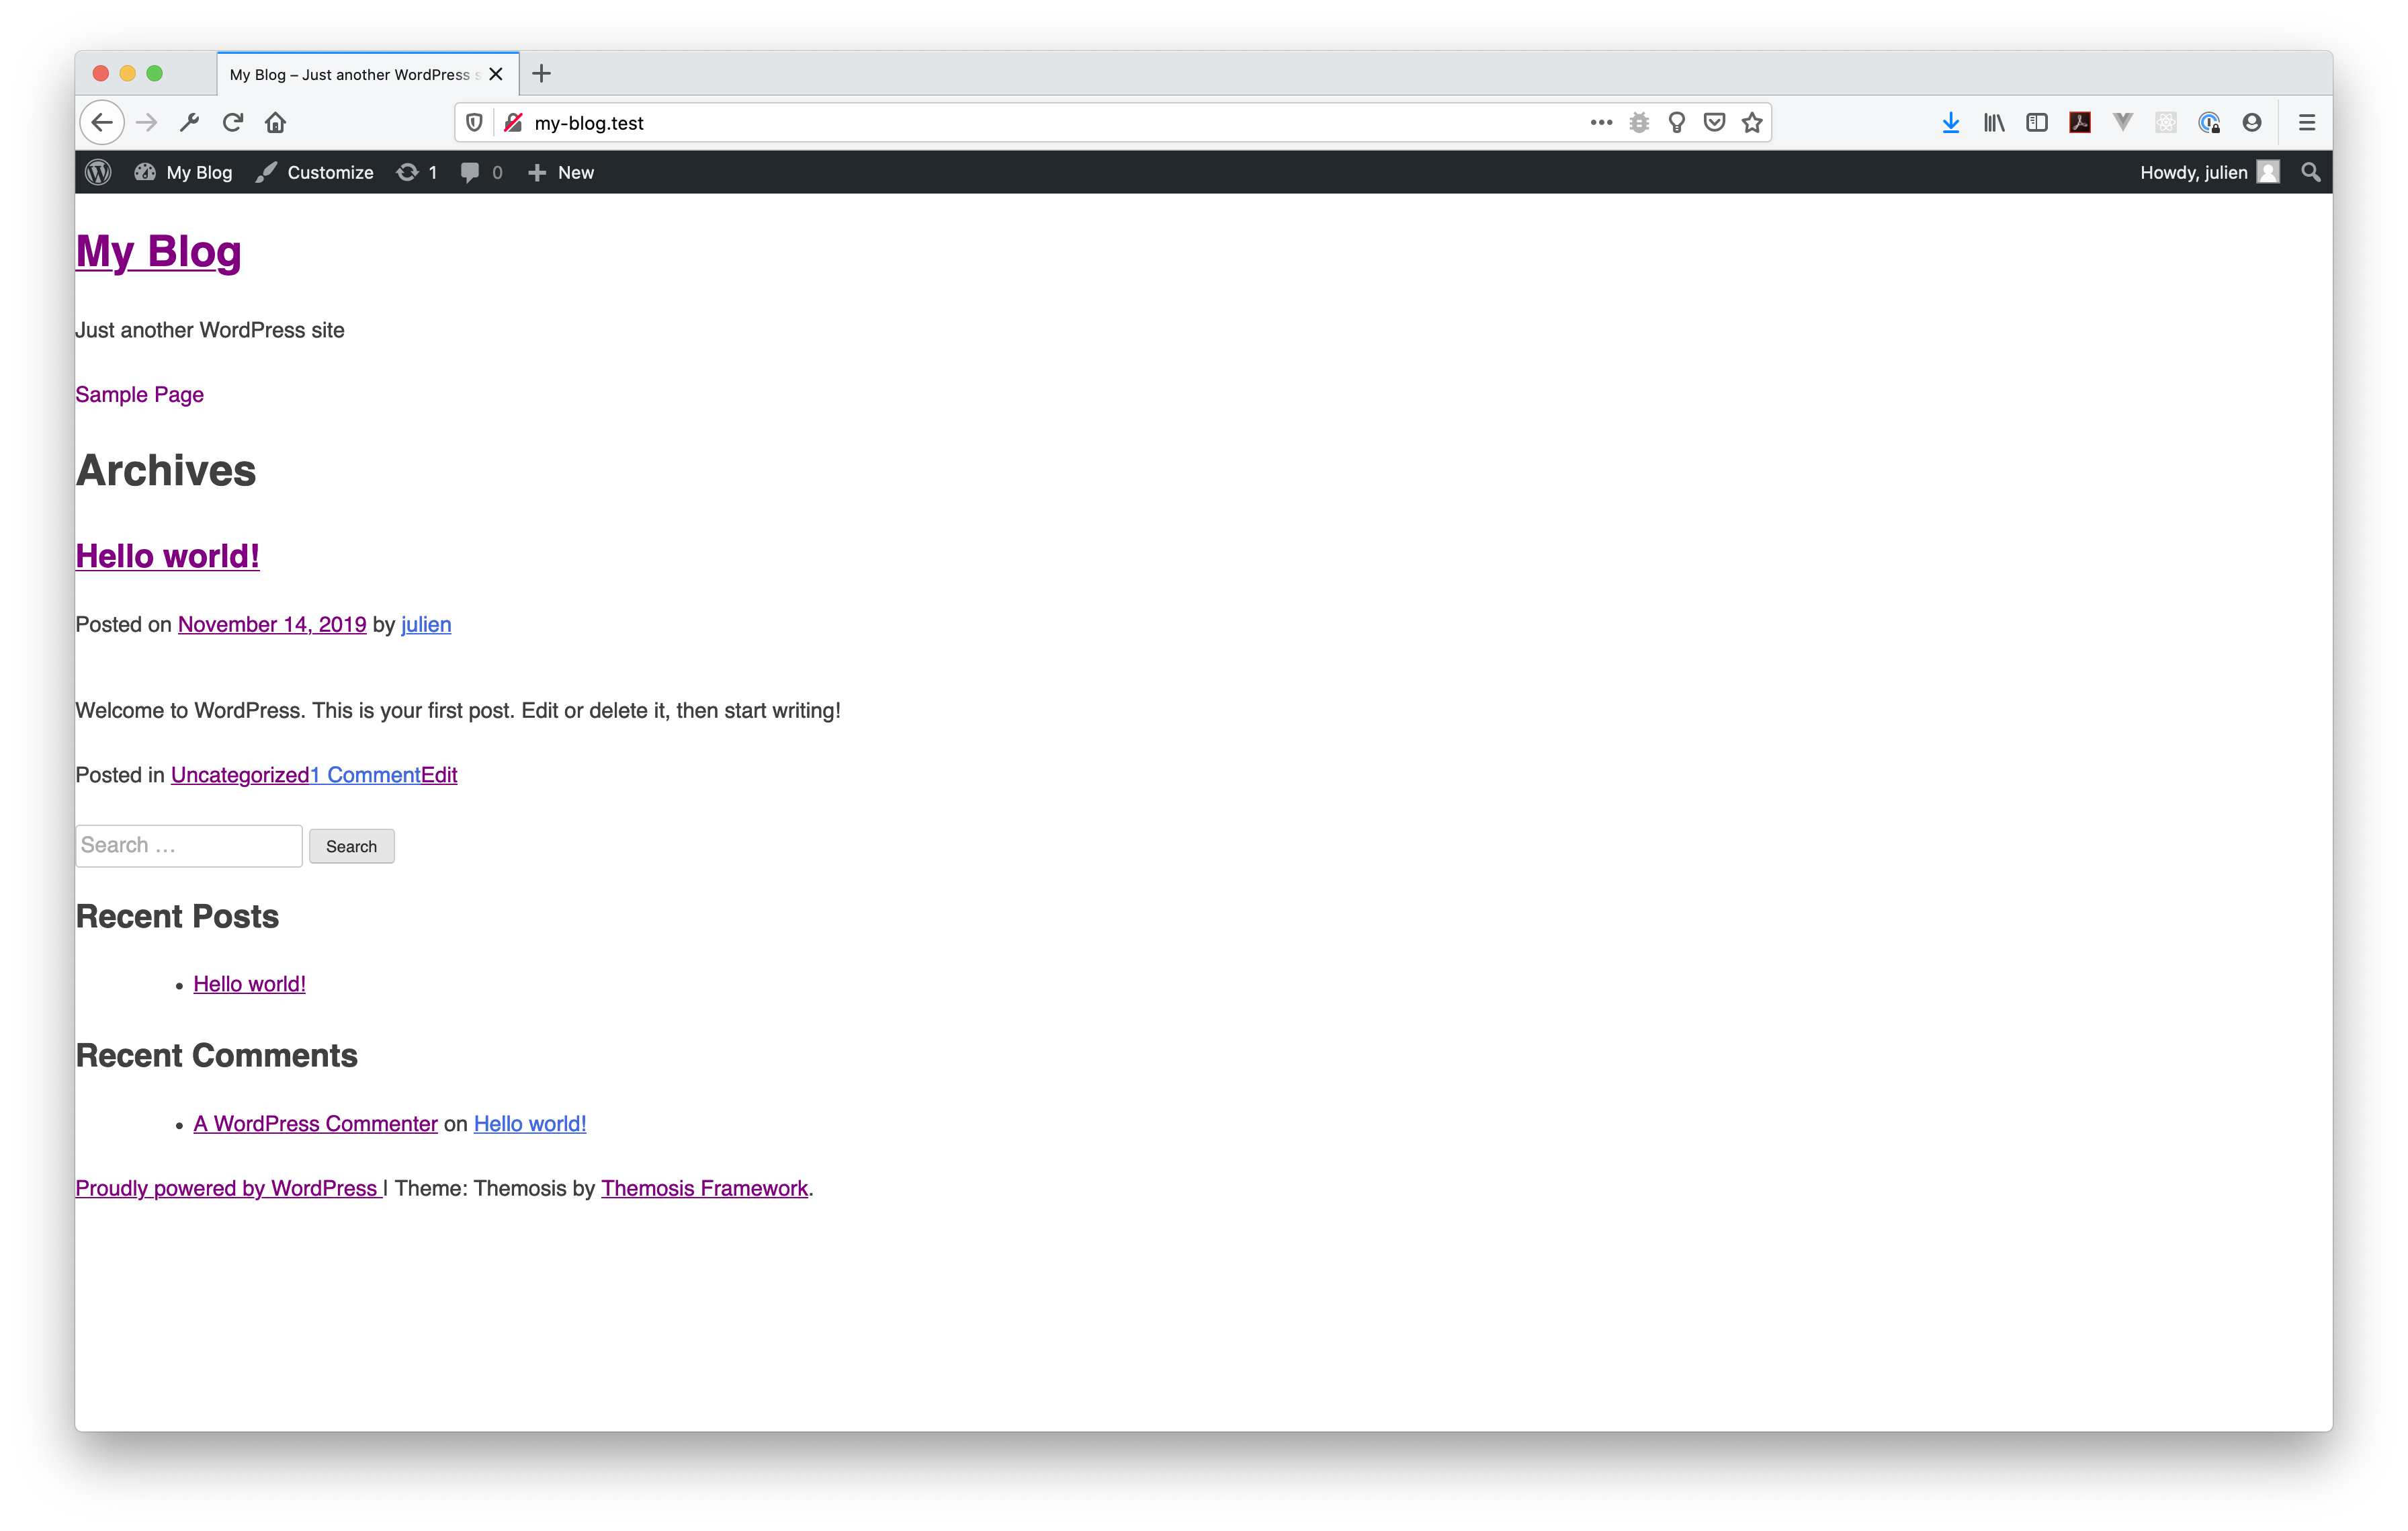
Visit the home page of your application in the browser and should have something similar to this:
Now let’s explore the view API and learn how this default home page layout is built.
Views
A view is basically a file that contains HTML code. But as we’re working with PHP, we can also find some dynamic code structures into a view file to help us loop through a list of data or run a condition in order to display a specific content and more.
The view API supports multiple “template engines”. By default, we can use the Laravel Blade engine but there is also a support for the Symfony Twig engine or just PHP.
In order to use a specific view engine, you only have to specify the file extension of your view file. If the extension is .blade.php, then you can use the Blade engine. If the extension is .twig, then use the Twig engine. And finally if the file extension is only .php, then use classic PHP tags in your view file.
For this tutorial, we’re using the Blade engine and the default view passed to our home page is the blog.archive view which is stored inside the theme views/blog/archive.blade.php file. Open the file into your code editor, you should see the following code:
@extends('layouts.main')

@section('content')
    @if(have_posts())
        <header class="page-header">
            <h1 class="page-title">{!!  get_the_archive_title() !!}</h1>
            <div class="archive-description">{!! get_the_archive_description() !!}</div>
        </header>
        @while(have_posts())
            @php(the_post())
            @template('parts.content', get_post_type())
        @endwhile
        {!! get_the_posts_navigation() !!}
    @else
        @template('parts.content', 'none')
    @endif
@endsection
Those 16 lines of code do handle the display of our home page. If you look at the file you can recognize some HTML code but also some new keywords starting with the @ character. Those keywords are called Blade directives and provide functionnality to help us output our content.
The first directive I would like to talk about is the @extends() directive. This function allows to extend another view file or HTML code in order to use shared code. Basically you use a “layout file” that contains common code for all your pages, like the header, the main navigation and the footer, then extend that file and simply insert your home page content.
The first parameter passed to the @extends() directive is the relative path to a view file, just like inside the view() helper function. In our archive view file, we extend a view called layouts.main, which is stored inside our theme into the views/layouts/main.blade.php file. Let’s open this file and see how it looks like. You should find something like this:
<!doctype html>
<html {!! get_language_attributes() !!}>
<head>
    <meta charset="{{ get_bloginfo('charset') }}">
    <meta name="viewport" content="width=device-width, initial-scale=1">
    <link rel="profile" href="https://gmpg.org/xfn/11">
    @head
</head>
<body @php(body_class())>
<div id="page" class="site">
    <a class="skip-link screen-reader-text" href="#content">{{ esc_html__('Skip to content', THEME_TD) }}</a>

    <header id="masthead" class="site-header">
        <div class="site-branding">
            {!! get_custom_logo() !!}
            @if(is_front_page() && is_home())
                <h1 class="site-title"><a href="{{ esc_url(home_url('/')) }}" rel="home">{{ get_bloginfo('name') }}</a></h1>
            @else
                <p class="site-title"><a href="{{ esc_url( home_url('/')) }}" rel="home">{{ get_bloginfo('name') }}</a></p>
            @endif

            @if(($description = get_bloginfo('description', 'display')) || is_customize_preview())
                <p class="site-description">{{ $description }}</p>
            @endif
        </div><!-- .site-branding -->

        <nav id="site-navigation" class="main-navigation">
            <button class="menu-toggle" aria-controls="primary-menu" aria-expanded="false">{{ esc_html__('Primary Menu', THEME_TD) }}</button>
            {!! wp_nav_menu([
                'theme_location' => 'menu-1',
                'menu_id' => 'primary-menu',
                'echo' => false
            ]) !!}
        </nav><!-- #site-navigation -->
    </header><!-- #masthead -->

    <div id="content" class="site-content">
        <div id="primary" class="content-area">
            <main id="main" class="site-main">
                @yield('content')
            </main>
        </div>
        <!-- Sidebar -->
        @if(is_active_sidebar('sidebar-1'))
            <aside id="secondary" class="widget-area">
                @php(dynamic_sidebar('sidebar-1'))
            </aside>
        @endif
        <!-- End sidebar -->
    </div><!-- #content -->

    <footer id="colophon" class="site-footer">
        <div class="site-info">
            <a href="{{ esc_url(__('https://wordpress.org/', THEME_TD)) }}">
                {{ sprintf(esc_html__('Proudly powered by %s', THEME_TD), 'WordPress') }}
            </a>
            <span class="sep"> | </span>
            {!! sprintf(esc_html__('Theme: %1$s by %2$s.', THEME_TD), 'Themosis', '<a href="https://framework.themosis.com">Themosis Framework</a>') !!}
        </div><!-- .site-info -->
    </footer><!-- #colophon -->
</div><!-- #page -->

@footer

</body>
</html>
If you look at the layout file, you can see that we have opening and closing html tags, some Blade directives and inside some directives, a call to just plain PHP functions.
When working with the Blade engine, we can easily call any PHP function from a directive.
Now if you check the code around line 40, you should find another Blade directive, the @yield('content') directive. This directive accepts only one parameter, which is a string. The @yield() directive lets you define a point of access or a place where to insert content when you extend that layout file. In this case, the section is called content but you can name it as you want.
Switching back to our blog.archive view file, see how we insert information by defining a section based on that @yield() directive. In order to insert content, simply use the @section() directive and @endsection() directive to close it. At line three, we can find the call to @section('content'). This is like an opening tag and the first parameter is the string name related to the layout @yield directive. And between the @section('content') and @endsection() directives, you can put any HTML code you want.
I invite you to explore the different Blade directives defined into the archive.blade.php file to better understand what’s possible to do. In the next step, we’re going to override all default assets with the ones of the Twentynineteen theme and then look on how to use Laravel Mix to compile some assets and then learn how to register and load an asset using the Themosis framework Asset class.
For a complete list of directives with examples, you can read the documentation here. The framework is also providing custom directives to work inside WordPress, feel free to explore them.
Setup Twentynineteen assets
In order to continue, let’s simply copy/paste the Twentynineteen theme assets to our default theme and override base styles, … Simply go to our GitHub account and download the twentynineteen repository (master branch). Here is a direct download link and unzip the files on your computer.
Simply copy/paste all the files into your own twentynineteen theme. This should replace all default files. Don’t worry, these theme files are just assets: sass files, javascript code and HTML code stored in view files build using the Blade engine.
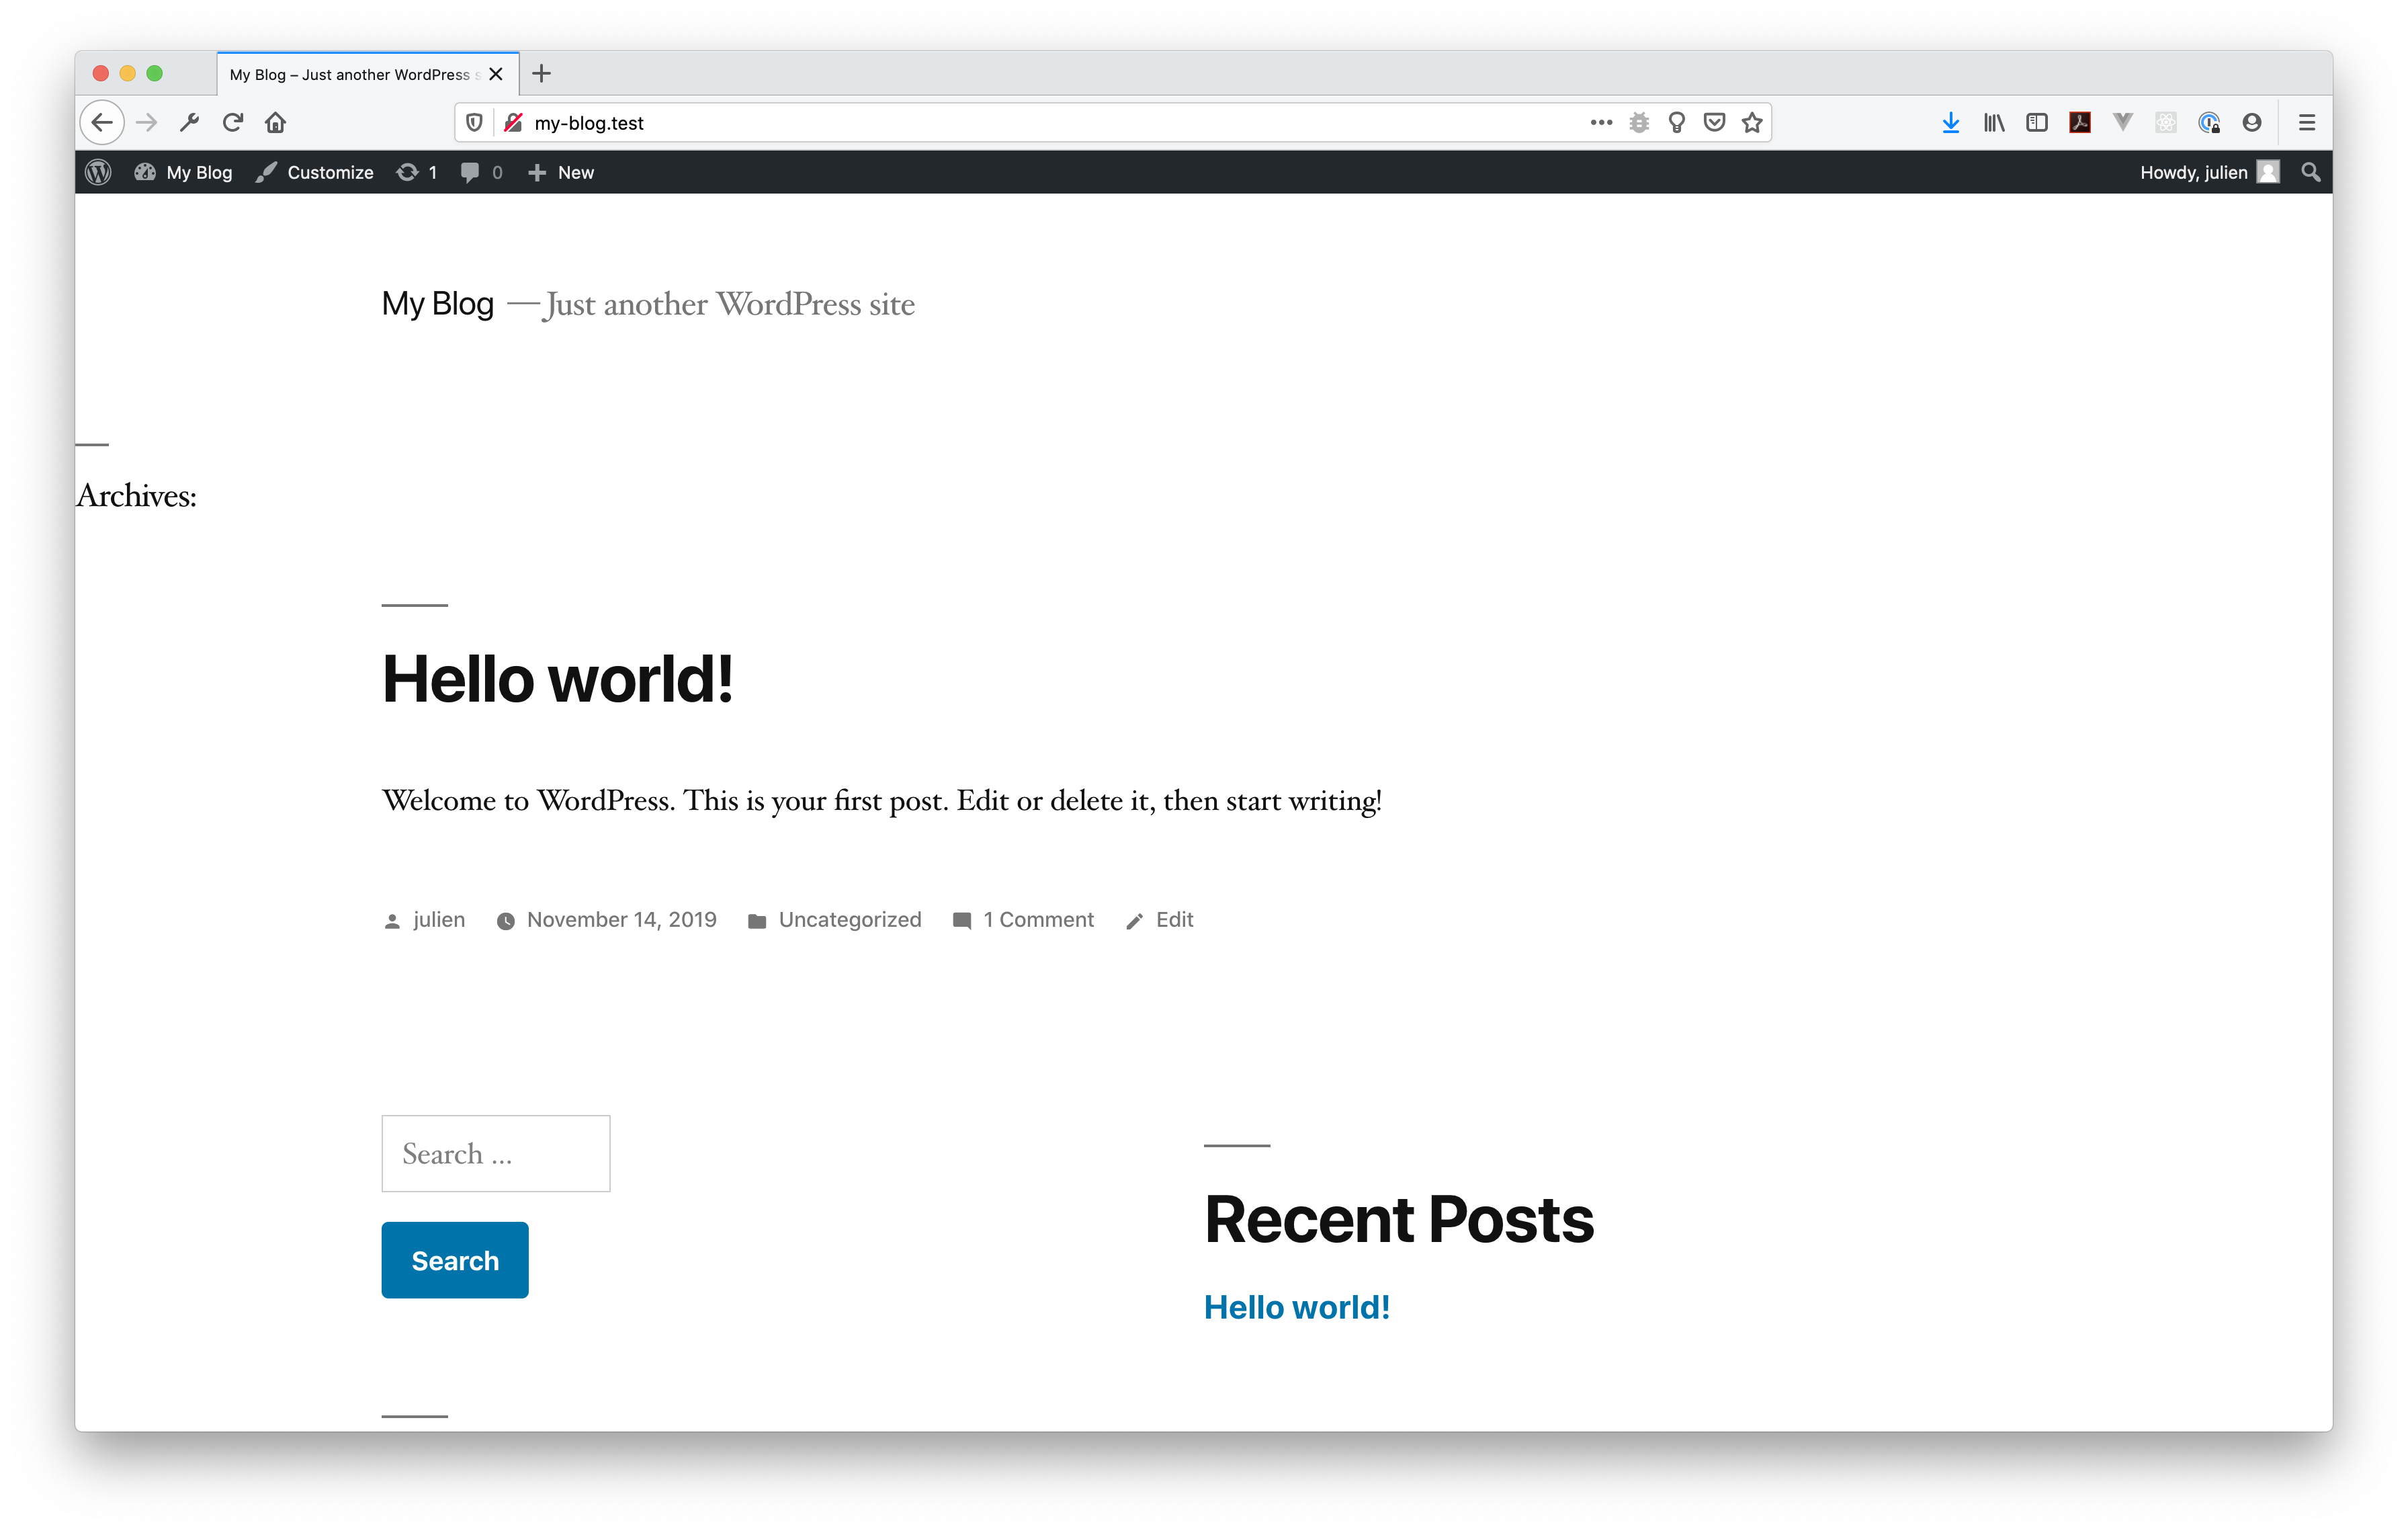
If you visit the browser back on your home page, you should now have something like the below picture:
Have an error?
If when you refresh your screen you get the an error, we simply need to flush the application cached views. Connect to the project virtual machine using the Terminal or Console and change the directory to the root of your application. Then run the following framework CLI command:
php console view:clearThe above command will clear all cached/old views. Then you can refresh your browser and now you should get the above content displayed as well.
Now let’s see how to use Laravel Mix in order to compile the theme assets.
Laravel mix
Laravel Mix is a wrapper around Webpack for the 80% use case. It is bundled by default with a theme built with the Themosis framework. All it needs to work is a configuration file stored inside your theme called webpack.mix.js.
Note that Laravel Mix is a module and is defined as a node package. If you open the theme package.json file, you can see that Laravel Mix is defined as a development dependency. So in order to work with Laravel Mix, you need to have NodeJS installed on your machine. Luckily for us, you don’t have to install it on your own computer because NodeJS is available inside our virtual machine. So connect to your virtual machine using the vagrant ssh command and then change the directory to your application theme like so:
# First connect to the virtual machine
vagrant ssh

# Then change the current directory to your application's theme
cd code/htdocs/content/themes/twentynineteen
Once you are inside your theme directory, simply install the modules by running the npm install command. It might take one or two minutes before everything is installed. Once installation is completed, we can now work with Laravel Mix, so let’s open the webpack.mix.js file in the code editor. You should have something like this:
let mix = require('laravel-mix');

/*
 |-----------------------------------------------------------------
 | Mix Asset Management
 |-----------------------------------------------------------------
 |
 | Mix provides a clean, fluent API for defining some Webpack build steps
 | for your Laravel application. By default, we are compiling the Sass
 | file for your application, as well as bundling up your JS files.
 |
 */
mix.setPublicPath('dist');

mix.sass('assets/sass/style.scss', 'dist/css/style.css')
    .sass('assets/sass/style-editor.scss', 'dist/css/style-editor.css')
    .sass('assets/sass/style-editor-customizer.scss', 'dist/css/style-editor-customizer.css')
    .sass('assets/sass/print.scss', 'dist/css/print.css');
The main thing we are interested into is the line with the mix.sass() method. This methods allows us to compile a Sass file into a stylesheet file. The first argument is the source file. Here we have the assets/sass/style.scss file. Note that the path is relative to this configuration file. Then the second parameter is the destination path, here we have dist/css/style.css. So this single line of code is going to compile a sass file, minifying it and optimize into a css file.
The theme is organized in a way that all your stylesheet styles and javascript source code should be written inside the theme assets directory. Then you compile your code into a “production build” into the theme dist folder.
So here in our webpack.mix.js file, we have only a configuration for sass files but Laravel Mix can handle also Javascript code, React, Vue, Typescript, Less, Stylus, PostCss, … In order to learn more about the features provided by Laravel Mix, do not hesitate to explore their official documentation.
Ok our files are now configured, but how can we compile those assets?
The theme package.json file is already configured to handle assets compilation. Three commands are available:
- The
devcommand: compiles once your assets without optimization. Used for development purpose only. - The
watchcommand: watch your files and when there is a change, compiles them just like thedevcommand. I personnally use this command all the time during development. - The
productioncommand: compiles once your assets for release with minification and optimization. You should only deploy assets compiled using theproductioncommand.
In order to run one of those commands, simply open your Terminal or Console and change the directory to your theme. Then simply use npm to run a command. In our example, try to run both the watch and production command like so:
# Run the "watch" command...
npm run watch

# Run the "production" command...
npm run production
If you want to learn more the commands, check the scripts property inside the theme package.json file.
As you can see, all theme assets are compiled to the dist directory. But Laravel Mix is not responsible of loading theme into the browser. This is still the theme responsability to register the necessary assets and to load them into the browser.
Let’s see how we can use the Themosis framework Asset API to load those compiled assets within our theme.
Load the assets
Working with the Themosis framework doesn’t change the fact that your theme assets should be registered and loaded by WordPress into the browser. But the Themosis framework provides a convenient wrapper to easily load assets in multiple locations of your application: in the front-end, in the administration or in the login screen.
We haven’t look into the theme structure yet. There are multiple locations where you could register your assets but in this tutorial I would like to show you only one, which is the method I generally use. We’re going to register the assets through the use of a theme service provider class.
A service provider class is a simple PHP class that registers a functionnality into your application. For information, your application registers many of them in order to work inside the root config/app.php file under the providers property. You have service provider classes that gives you the Routing API, the Asset API, the View API, the PostType API, … a provider class registers a service and makes it available for programming use in your application.
Within a Themosis framework application, we support those service providers at the root, during bootstrap but also inside plugins and themes. A service provider class registered at the root is available in the overall application, a service provider class registered inside a plugin is only available in that plugin and theme, a service provider class registered inside a theme is only available for the theme.
Because service providers are PHP classes, the theme is configured to store classes into its resources directory. All classes are also autoloaded, so you don’t need to include or require them in order to use them. Classes are loaded using the PSR-4 standard and all classes stored inside the theme resources directory are namespaced under the Theme namespace.
By default, there is an AssetServiceProvider.php class stored into the theme resources/Providers folder. Open that file. You should have a code like this:
<?php

namespace Theme\Providers;

use Illuminate\Support\ServiceProvider;
use Themosis\Core\ThemeManager;
use Themosis\Support\Facades\Action;
use Themosis\Support\Facades\Asset;

class AssetServiceProvider extends ServiceProvider
{
    /**
     * Theme Assets
     *
     * Here we define the loaded assets from our previously defined
     * "dist" directory. Assets sources are located under the root "assets"
     * directory and are then compiled, thanks to Laravel Mix, to the "dist"
     * folder.
     *
     * @see https://laravel-mix.com/
     */
    public function register()
    {
        /** @var ThemeManager $theme */
        $theme = $this->app->make('wp.theme');

        Asset::add('twentynineteen-style', 'css/style.css', [], $theme->getHeader('version'), 'screen')->to();
        wp_style_add_data('twentynineteen-style', 'rtl', 'replace');

        if (has_nav_menu('menu-1')) {
            Asset::add('twentynineteen-priority-menu', '/js/priority-menu.js', [], '1.1', true);
            Asset::add('twentynineteen-touch-navigation', '/js/touch-keyboard-navigation.js', [], '1.1', true);
        }

        Asset::add('twentynineteen-print-style', 'css/print.css', [], $theme->getHeader('version'), 'print')->to();

        Action::add('wp_enqueue_scripts', function () {
            if (is_singular() && comments_open() && get_option('thread_comments')) {
                wp_enqueue_script('comment-reply');
            }
        });
    }
}
The service provider has one register method where you insert the code to register and load your assets.
Look at the following line of code:
Asset::add('twentynineteen-style', 'css/style.css', [], $theme->getHeader('version'), 'screen')->to();The above code is calling the Asset class and using the add() method to register our previously compiled asset dist/css/style.css. The list of parameters is the same as in the WordPress wp_enqueue_style function or the wp_enqueue_script function. The Asset class add() method handles both type of assets.
The first parameter is the asset handle name, then the second parameter is the relative path based on the theme dist directory. The thirtd parameter is the list of dependencies. The fourth parameter is the asset version. In this case we’re using a ThemeManager instance utility provided by the framework to fetch the theme version. And the fifth parameter is the media type if your asset is a stylesheet or the loading location if a javascript file.
Finally you need to chain the to() method in order to load the asset into a location. By default it loads the asset on the front-end, the user facing side of your application. You can also pass the front value like so:
Asset::add('twentynineteen-style', 'css/style.css', [], '1.0', 'screen')->to('front');The to() method accepts the following values: front, admin, login and customizer. If your asset is used on multiple location, simply pass an array like so:
Asset::add('twentynineteen-style', 'css/style.css', [], '1.0', 'screen')->to(['front', 'admin']);In the above code, the asset is loaded in both the front-end and the WordPress administration.
This now closes our third step of our tutorial. I hope those explanations give you a better picture of a Themosis theme and how to organize your assets and compile them using Laravel Mix.
In the next part, we’re going to define all the routes needed for our simple blog application and apply the last final touches.
As always, I encourage you to read the extra resources posted below. See you in the next article 😁!
Next: Getting started with the Themosis framework – Part 4
Resources
Here is a list of references to check if you’re looking for more detailed informations on a subject: